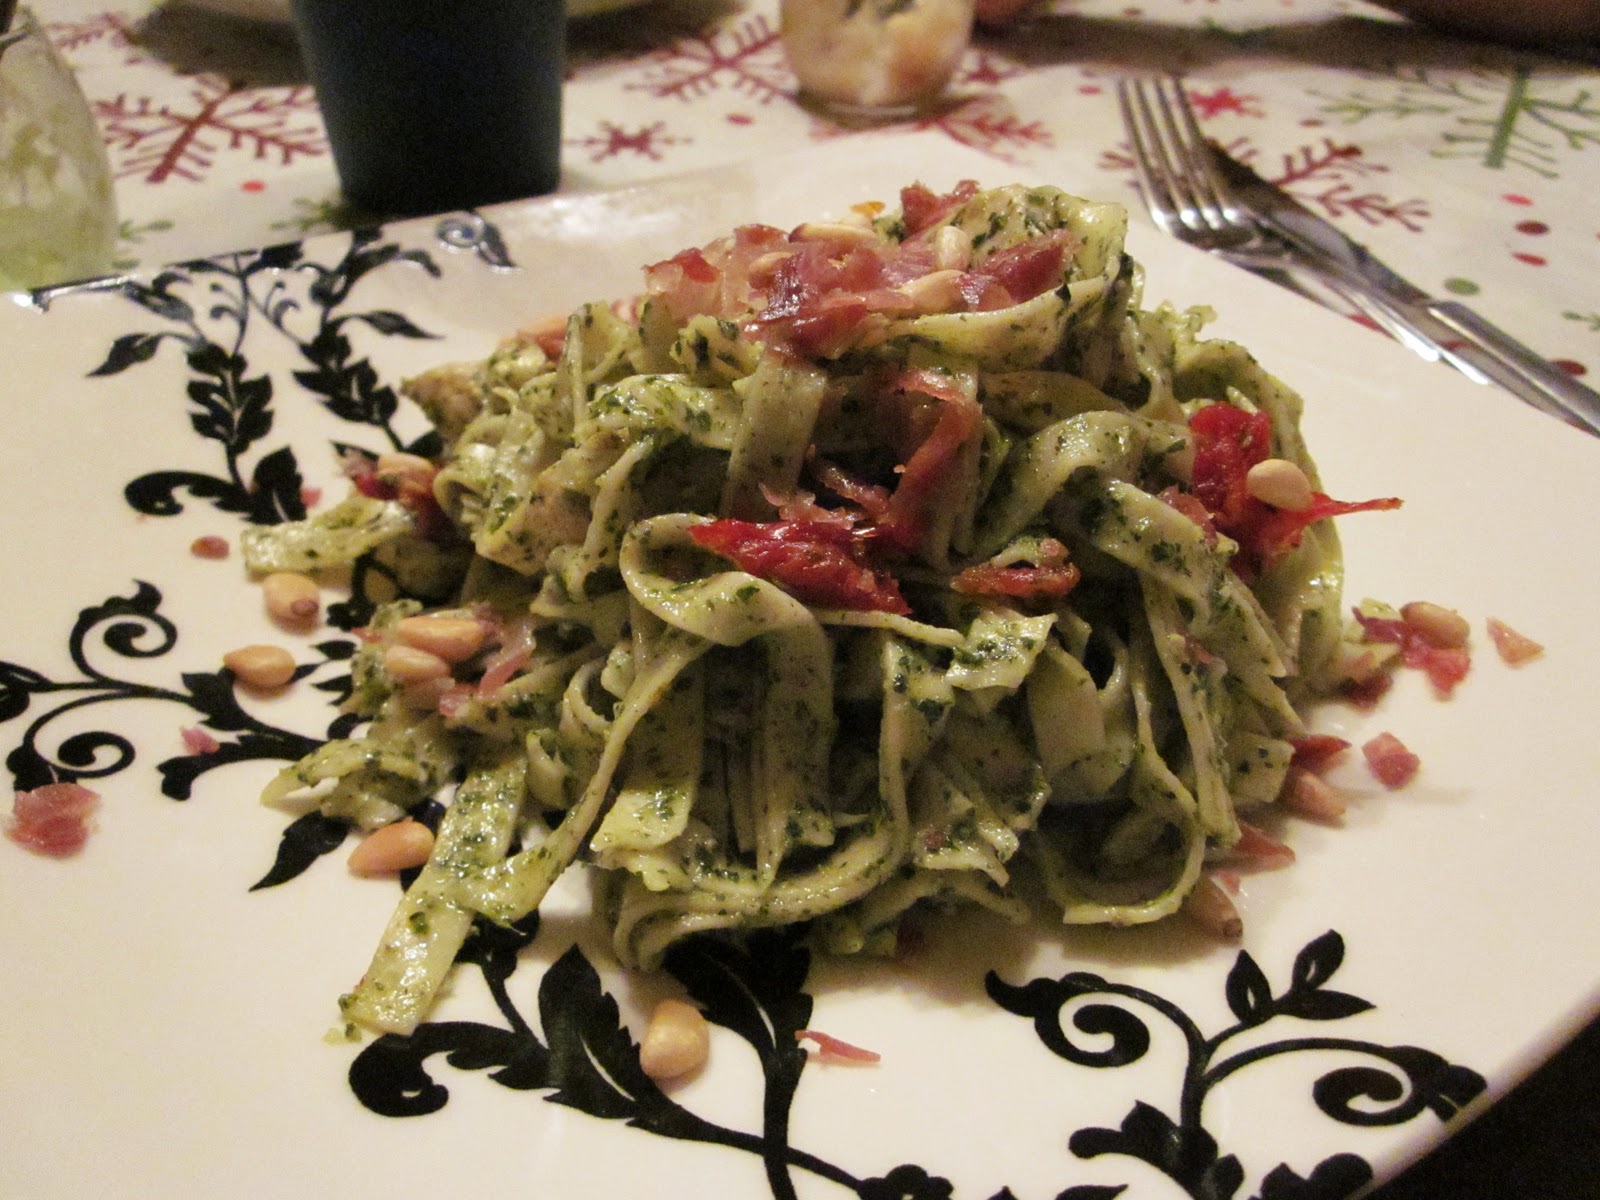
Pasta- such an easy way to please people. Especially when you need to cook for a lot of people, it's easy to make a lot of it. + Pesto- the best thing ever made with fresh basil. Although this is not the cheapest recipe on my blog, if you are cooking for a special occasion, or want to make something that tastes like something you'd eat sitting at a gourmet restaurant, then tie on your apron and get ready to cook my Pesto Pasta!
Ingredients (amounts will vary on amount of people. This is for 4 servings)
Pasta- you can use any kind, but I used 2 packages of fresh linguini found in the fridge section
Chicken- 3 raw chicken breasts chopped in nugget sized pieces and marinated in a little olive oil, lemon juice, minced garlic, salt and pepper
Prosciutto- 3 slices from the deli- sliced into small strips (it may look raw, but because of how it's cured you don't need to cook it.)
Pine nuts- toasted in a pan until golden brown
Pesto- you can buy this fresh in the fridge section by the pasta, or feel free to make your own if you grow basil!
Sun dried tomatoes- grab a jar of them that are in olive oil, they are more moist and flavorful. Chop several into thin slices
Cook pasta, fry chicken in pan til golden brown and cooked through. Toss pasta and pesto together. Serve on plate and sprinkle with chicken pieces, prosciutto, pine nuts and sun dried tomatoes. The thing about this dish is that everything adds a little something to it, a different texture, and a different flavor, but everything goes so well together!
Finding joy and reasons to love one other and the things around us is a daily task that I like to call an adventure. God has placed so many fantastic things around us and one of those things is food. I hope to be able to bring some joy to you that you can share with others- be it through cooking or other things I discover that make me smile. :)
Sunday, December 11, 2011
Strawberry Pretzel = Magical
One of our family favorites at holidays is what we like to call Strawberry Pretzel (or Strawberry Pretzel Salad). It may sound strange at first, but it will change your life when you put that first bite in your mouth. Just as a clarification too- this is not a dessert, but a side dish. Jello salads are always a side dish. Now please prepare to have your tastebuds changed forever!
This is from my Aunt Kathy:
2 cups crushed pretzels
3/4 c melted butter
1 (8 oz. ) pkg cream cheese
1/2 cup sugar
1 (8 oz. ) cool whip
2 small or one large package strawberry jello
2 cups boiling water
2 (10 oz.) packages frozen strawberries (I get the frozen sliced ones)
- Mix crushed pretzels with melted butter. Spread in 9 x 13 inch glass dish. Bake at 350 degrees for 10 minutes. Cool completely.
- Mix softened cream cheese, sugar, and Cool Whip with hand mixer.
- Spread over cooled pretzel crust. It is essential to spread to edges and make a “seal” over the pretzels. Otherwise the jello will seep down and make the pretzels soggy and yucky.
- Cool in refrigerator.
- Mix Jello and boiling water, add frozen strawberries. Cool til room temperature. Pour over cream cheese layer.
- Chill until jello is firm.
- To serve, cut into squares.
- Enjoy! YUM!
The secrets of an ice cream cake
Everyone loves ice cream, and everyone loves cakes. But an ice cream cake? So much better. When you go to a store (unless you want to spend the big bucks) you normally have very limited options of flavors for this delicious frozen dessert. The trick is- to spend way less money, and get the flavors you want! It is not hard at all, but there are a few steps that are very important.
Step # 1: Pick out 2 of your favorite ice creams- in this picture I used cookies and cream and mint chocolate chip.
Step # 2: Grab a box of cookies- oreos, grasshoppers (the chocolate covered chocolate mint cookies like Girl Scout Thin Mints) chocolate chip, graham crackers. Crush them up in a gallon ziploc bag.
Step # 3: Get out 2 round cake pans and some sturdy non-stick foil. Line both pans with the foil
Step # 4: Press cookie pieces in bottom of both pans. (If you are using graham crackers or some other dry cookie you may want to mix them with a few tablespoons of melted butter or chocolate to help them stick together better.
Step # 5: Take out ice creams and let them soften enough so you can stir them and spread them in the pans on top of the cookie crust but not so much that it's liquid. You may add in chopped strawberries, pieces of cookie dough, nuts, chopped candy bars, more crushed oreos or pretty much anything you find delicious
Step # 6: Carefully spread one of your types of ice cream in one pan, and the other flavor in the other pan. Freeze them for several hours, but not all day or all night, or they will be very hard to slice.
Step # 7: Make whipped cream. Cool Whip does hold up better than fresh whipped cream and doesn't melt, but doesn't taste quite as good. Whichever you choose will work. If you are making it- Beat a large container of whipping cream with a tsp of vanilla and some stevia or powdered sugar (til sweet enough) until it looks the consistency of whipped cream
Step # 8: Once the ice cream pans are frozen solid, take one out and leave the other one in. Flip it upside-down onto a plate and carefully peel off the foil. Flip back onto a plate so the cookie part is on the plate. Stick this plate back into the freezer and take out the second pan and repeat. Stick this plate back into the freezer and take out the first one, spreading quickly the whipped cream on the top and replacing in the freezer. Repeat with the second.
Step # 9: The most important part is to leave the cake in the freezer until right when you are going to serve it, because it begins to melt within minutes. Take out both pieces and stack one on top of the other, frosting the sides with whipped cream. Replace in freezer until ready to eat- hopefully soon!
You may of course press cookie pieces around the entire cake, but just remember to keep putting it back in the freezer when it starts to melt. They taste absolutely delicious, and it's awesome that you can make them however you please!
** To make this easier, you can always make it in a 9x13 inch pan. Just put cookie pieces right in bottom of pan (leave out foil) and spread the ice cream on top. Freeze and top the whole thing with whipped cream. This is faster and won't melt so easy (and won't make a mess), it just depends on how you want it to look, but the taste will be the same.**
Step # 1: Pick out 2 of your favorite ice creams- in this picture I used cookies and cream and mint chocolate chip.
Step # 2: Grab a box of cookies- oreos, grasshoppers (the chocolate covered chocolate mint cookies like Girl Scout Thin Mints) chocolate chip, graham crackers. Crush them up in a gallon ziploc bag.
Step # 3: Get out 2 round cake pans and some sturdy non-stick foil. Line both pans with the foil
Step # 4: Press cookie pieces in bottom of both pans. (If you are using graham crackers or some other dry cookie you may want to mix them with a few tablespoons of melted butter or chocolate to help them stick together better.
Step # 5: Take out ice creams and let them soften enough so you can stir them and spread them in the pans on top of the cookie crust but not so much that it's liquid. You may add in chopped strawberries, pieces of cookie dough, nuts, chopped candy bars, more crushed oreos or pretty much anything you find delicious
Step # 6: Carefully spread one of your types of ice cream in one pan, and the other flavor in the other pan. Freeze them for several hours, but not all day or all night, or they will be very hard to slice.
Step # 7: Make whipped cream. Cool Whip does hold up better than fresh whipped cream and doesn't melt, but doesn't taste quite as good. Whichever you choose will work. If you are making it- Beat a large container of whipping cream with a tsp of vanilla and some stevia or powdered sugar (til sweet enough) until it looks the consistency of whipped cream
Step # 8: Once the ice cream pans are frozen solid, take one out and leave the other one in. Flip it upside-down onto a plate and carefully peel off the foil. Flip back onto a plate so the cookie part is on the plate. Stick this plate back into the freezer and take out the second pan and repeat. Stick this plate back into the freezer and take out the first one, spreading quickly the whipped cream on the top and replacing in the freezer. Repeat with the second.
Step # 9: The most important part is to leave the cake in the freezer until right when you are going to serve it, because it begins to melt within minutes. Take out both pieces and stack one on top of the other, frosting the sides with whipped cream. Replace in freezer until ready to eat- hopefully soon!
You may of course press cookie pieces around the entire cake, but just remember to keep putting it back in the freezer when it starts to melt. They taste absolutely delicious, and it's awesome that you can make them however you please!
** To make this easier, you can always make it in a 9x13 inch pan. Just put cookie pieces right in bottom of pan (leave out foil) and spread the ice cream on top. Freeze and top the whole thing with whipped cream. This is faster and won't melt so easy (and won't make a mess), it just depends on how you want it to look, but the taste will be the same.**
The Best thing since sliced bread
Bread. One of the oldest foods in the whole word, and we are still eating it and loving it. Many people shudder at the thought of making their own bread, not even knowing where to begin. Although bread is not difficult to make by any means, it is crucial that you follow the directions exactly. Even if you don't get it perfect the first time, don't give up! The consistency of bread can even be affected by the weather- the amount of moisture in the air, so it may not even be anything that you can control. When you have a loaf in the oven, don't be opening the door and slamming it shut, because that can affect how poofy it turns out to be (or how well your bread rises).
If you are going to begin your bread making attempts, may I suggest that you start out with a banana bread, or this Irish Soda Bread.
Irish Soda Bread
It is called Soda bread because it has Baking Soda instead of yeast. Yeast bread you have to mix up, let it rise, knead it, let it rise again and bake it. Soda bread is easy and very fast because you don't have to let it rise. Just mix it up and stick it in the oven for an hour. It is absolutely delicious, and has a sweeter taste to it than French bread (for example), but it would make great sandwiches. It is crusty on the outside and soft on the inside. I find it better with honey or jelly than garlic butter, but you may like it either way. It calls for Cream of Tartar- a white powder found in the spice section in the baking aisle of the store. This is also used when making meringues. Just make sure you have buttermilk on hand! Since you won't probably use the whole jug of buttermilk, just use the rest when you make pancakes :)
My favorite pancakes you don't have to put bananas and pecans in them, you can put in blueberries, strawberries, apples, coconut, almonds or chocolate chips. They turn out fantastic though :)
Who doesn't love cornbread?
Baked or fried, it is always delicious.
Well, if you don't feel like waiting for
it to get done in the oven,
or you don't want the oil from the frying-
try it in a waffle maker. Grab a box of Jiffy cornbread mix next time you are at the store for 59 cents and bust out your Belgian (or any other) waffle maker you have and have delicious, fluffy cornbread on your plate in 2 minutes! One box made 3 whole waffles in my waffle maker, which turns out to be 12 pieces. I put a little sour cream on them instead of whipped cream on waffles, but honey is still always good too. FYI- the recipe for the cornbread waffles is on the side of the Jiffy box. These are by the biscuit mixes on the baking aisle in the store in a little blue and white box. Enjoy!
If you are going to begin your bread making attempts, may I suggest that you start out with a banana bread, or this Irish Soda Bread.
Irish Soda Bread
It is called Soda bread because it has Baking Soda instead of yeast. Yeast bread you have to mix up, let it rise, knead it, let it rise again and bake it. Soda bread is easy and very fast because you don't have to let it rise. Just mix it up and stick it in the oven for an hour. It is absolutely delicious, and has a sweeter taste to it than French bread (for example), but it would make great sandwiches. It is crusty on the outside and soft on the inside. I find it better with honey or jelly than garlic butter, but you may like it either way. It calls for Cream of Tartar- a white powder found in the spice section in the baking aisle of the store. This is also used when making meringues. Just make sure you have buttermilk on hand! Since you won't probably use the whole jug of buttermilk, just use the rest when you make pancakes :)
My favorite pancakes you don't have to put bananas and pecans in them, you can put in blueberries, strawberries, apples, coconut, almonds or chocolate chips. They turn out fantastic though :)
Who doesn't love cornbread?
Well, if you don't feel like waiting for
it to get done in the oven,
or you don't want the oil from the frying-
try it in a waffle maker. Grab a box of Jiffy cornbread mix next time you are at the store for 59 cents and bust out your Belgian (or any other) waffle maker you have and have delicious, fluffy cornbread on your plate in 2 minutes! One box made 3 whole waffles in my waffle maker, which turns out to be 12 pieces. I put a little sour cream on them instead of whipped cream on waffles, but honey is still always good too. FYI- the recipe for the cornbread waffles is on the side of the Jiffy box. These are by the biscuit mixes on the baking aisle in the store in a little blue and white box. Enjoy!
Saturday, November 5, 2011
What do you think of when someone says Fall?
Apple cider? Pumpkins? Pulling out the sweaters and hoodies? Walking outside into the crisp air, smelling leaves burning... Whatever thoughts I have about fall all make me smile. There is just something about it when the weather turns from hot to cool and you can curl up with a blanket and a hot drink that just is so happy. Well, for me this is something that calls for a party. So, in between Halloween and Thanksgiving, why not have a fall party? This is what I did last night. This meal is quite filling, so may I suggest taking a small siesta in between courses :) Here are the recipes that I used that all turned out delicious:
Appetizers:
-Best Spinach Dip
-Sauteed Butternut Squash
-Pigs in a blanket (I use the little weenie sausages)
-Spinach Salad with Apple Cider Vinaigrette and I chopped up some green apples and mixed them in the dressing to keep them from turning brown. I sprinkled Candied Pecan pieces on top. (Feta cheese would be good too)
Main Course:
-Chili (the one that I already posted about earlier)
-Cornbread
Dessert:
-Pumpkin Gingerbread Trifle and hot apple cider
I made my own whipped cream instead of using cool whip by beating heavy whipping cream with a teaspoon vanilla and a few tablespoons sugar. I also added some pumpkin pie spice to my pumpkin mixture and it was delicious :)
So.... Happy Fall!
Appetizers:
-Best Spinach Dip
-Sauteed Butternut Squash
-Pigs in a blanket (I use the little weenie sausages)
-Spinach Salad with Apple Cider Vinaigrette and I chopped up some green apples and mixed them in the dressing to keep them from turning brown. I sprinkled Candied Pecan pieces on top. (Feta cheese would be good too)
Main Course:
-Chili (the one that I already posted about earlier)
-Cornbread
Dessert:
-Pumpkin Gingerbread Trifle and hot apple cider
I made my own whipped cream instead of using cool whip by beating heavy whipping cream with a teaspoon vanilla and a few tablespoons sugar. I also added some pumpkin pie spice to my pumpkin mixture and it was delicious :)
So.... Happy Fall!
Cookies- fast, different and delicious
There are few things in the realm of food that I love more than cookies. Whether you are 3 years old sitting in front of the oven window gazing in anticipation as M&M cookies rise before your eyes as the irresistible aroma fills the house or you are cooking 12 different kinds of cookies for Christmas, or coming in from a long day of playing in the snow to sit in front of a fireplace, you can insert cookies into any day and it just makes it a little bit better.
Oreo Truffles are some of my favorites:
Oreo Truffles are just a few minutes away!
One thing that makes them very easy is if you can find the Baker's Chocolate bowls in the baking aisle. It's a small bowl with a chocolate covered strawberry on the front. You can stick it in the microwave and the chocolate stays melted long enough to dip them. You will need 2 of these bowls for 1 batch of truffles though. They are fantastic, but really rich, so maybe make them kind of small.
Above you see another fantastic cookie that is super simple. It is Just a regular sugar cookie cut in whatever shape you'd like, with Mascarpone cheese on top. This cheese is in a small tub probably near the nicer cheeses like feta (by the deli section) of your grocery store. It is about the same consistency of cream cheese but without the cream cheese flavor. Just picture milk if it was the consistency of cream cheese and that's what it tastes like. It is a great addition to pastas and cheese sauces to make them extra creamy. But for this cookie just spread it on the cookie (once it's cooled) and top with whatever fruit you'd like. I used peaches, raspberries and blueberries and it was great.
Both of these are simple recipes that are just a little different and fantastic to serve at parties or wherever. Just remember, please pick up some milk. Because what are cookies without milk?
Monday, August 1, 2011
Quinoa...what?
Tonight I made quinoa. And no, I didn't just make that word up. It's pronounced Keen-wah. It is a type of grain that can be a substitute for rice, couscous or even oatmeal or pasta. I can't tell you how much I love it! This is from Wikipedia about it-and you can click on the link to read more about it.
"Unlike wheat or rice (which are low in lysine), and like oats, quinoa contains a balanced set of essential amino acids for humans, making it a complete protein source, unusual among plant foods.[12] It is a good source of dietary fiber and phosphorus and is high in magnesium and iron. Quinoa is gluten-free and considered easy to digest." from Wikipedia http://en.wikipedia.org/wiki/Quinoa
What I love about it-first of all is that it is so versatile- it has a slightly nutty flavor (as some people call it, but doesn't feel like you're eating nuts) and it really can be made with fruit, honey and milk for breakfast, or mix in some meat, spices and vegetables and eat it for dinner. You can also eat it hot or cold. And it is so good for you! There are a few different ways it comes- either red (like the picture) or a lighter version- kind of cream colored. I've heard that the red has more fiber though. You can also buy it pre-soaked or not soaked. If it's pre-soaked all you have to do is rinse it with in a fine strainer before you cook it in water or chicken (or other type) of broth for about 15 minutes. If you buy the un-soaked kind you will need to soak it for several hours or overnight to remove the bitter outside. (I get the faster kind :)
So the way I fixed it tonight was absolutely delicious. I found this recipe on Food Network that I kind of went off of. I love pine nuts but they are pretty expensive, so I left them out today. I also didn't have fresh parsley on hand, but I did everything else the same. I also made chicken:
Garlic lime chicken (SO delicious)
My brother always makes this marinade and it works so well on chicken, steak, salmon... ( and probably a lot more)
(3 chicken breasts will easily be 5-6 servings with the quinoa)
-2 limes juiced (or lemons)
-2 tablespoons olive oil
-either a little dry basil crushed up
or 4-6 fresh basil leaves chopped finely
-5 cloves of garlic-minced
-a sprinkle of salt and pepper
Marinade chicken in this for at least 15 min. Be sure to turn it over and rub it all around so the flavors get in it. Then fry it in a pan til brown. (Save the rest of the marinade in the bowl cuz you'll use it) After you've made the quinoa and fried up the diced onions for it- take out the chicken and chop it up. Put the browned onions and the rest of the marinade back into the frying pan so you can cook the marinade to kill all the raw chicken juice. Once it's nice and hot (steaming but not burnt) pour in the quinoa, a small apple (peeled and diced) and your chicken. It is SO delicious! And quinoa is very filling. You won't need as much chicken per serving as you might normally eat because the quinoa has a good amount of protein. I suggest having a salad and a vegetable like broccoli, asparagus or green beans on the side.
Quinoa recipe from Food Network
You can find quinoa at Whole Foods, health food stores and probably some Publix stores (I haven't really checked yet.) Enjoy and let me know if you have any questions!!
| Uncooked red quinoa |
"Unlike wheat or rice (which are low in lysine), and like oats, quinoa contains a balanced set of essential amino acids for humans, making it a complete protein source, unusual among plant foods.[12] It is a good source of dietary fiber and phosphorus and is high in magnesium and iron. Quinoa is gluten-free and considered easy to digest." from Wikipedia http://en.wikipedia.org/wiki/Quinoa
What I love about it-first of all is that it is so versatile- it has a slightly nutty flavor (as some people call it, but doesn't feel like you're eating nuts) and it really can be made with fruit, honey and milk for breakfast, or mix in some meat, spices and vegetables and eat it for dinner. You can also eat it hot or cold. And it is so good for you! There are a few different ways it comes- either red (like the picture) or a lighter version- kind of cream colored. I've heard that the red has more fiber though. You can also buy it pre-soaked or not soaked. If it's pre-soaked all you have to do is rinse it with in a fine strainer before you cook it in water or chicken (or other type) of broth for about 15 minutes. If you buy the un-soaked kind you will need to soak it for several hours or overnight to remove the bitter outside. (I get the faster kind :)
So the way I fixed it tonight was absolutely delicious. I found this recipe on Food Network that I kind of went off of. I love pine nuts but they are pretty expensive, so I left them out today. I also didn't have fresh parsley on hand, but I did everything else the same. I also made chicken:
Garlic lime chicken (SO delicious)
My brother always makes this marinade and it works so well on chicken, steak, salmon... ( and probably a lot more)
![]() |
| Cooked red quinoa |
-2 limes juiced (or lemons)
-2 tablespoons olive oil
-either a little dry basil crushed up
or 4-6 fresh basil leaves chopped finely
-5 cloves of garlic-minced
-a sprinkle of salt and pepper
Marinade chicken in this for at least 15 min. Be sure to turn it over and rub it all around so the flavors get in it. Then fry it in a pan til brown. (Save the rest of the marinade in the bowl cuz you'll use it) After you've made the quinoa and fried up the diced onions for it- take out the chicken and chop it up. Put the browned onions and the rest of the marinade back into the frying pan so you can cook the marinade to kill all the raw chicken juice. Once it's nice and hot (steaming but not burnt) pour in the quinoa, a small apple (peeled and diced) and your chicken. It is SO delicious! And quinoa is very filling. You won't need as much chicken per serving as you might normally eat because the quinoa has a good amount of protein. I suggest having a salad and a vegetable like broccoli, asparagus or green beans on the side.
Quinoa recipe from Food Network
You can find quinoa at Whole Foods, health food stores and probably some Publix stores (I haven't really checked yet.) Enjoy and let me know if you have any questions!!
Saturday, July 23, 2011
The City's Cellar
Last night my boyfriend took me to City Cellar. It was so incredibly delicious! I got the Crab Crusted Chilean Sea Bass with asparagus and a potato pancake. Sadly I forgot to bring my camera, because I would have definitely taken a picture of that masterpiece of a plate. The fish just melted in my mouth and the potato pancake was browned to perfection with a sauce that tied everything on the plate together. I must say that entrees run between $25-$35, but if you go between 4-7pm they have 1/2 off appetizers if you sit at the bar. It may not be somewhere that you eat at every week, but if you are looking for a nice place to sit down and have a dinner cooked to perfection-this is a place that will probably not disappoint you!
http://www.bigtimerestaurants.com/
Sunday, July 17, 2011
Bushels for pennies
Yesterday my friend Amanda took me to Don Victorio's Market-a place that another one of our friends introduced her to a few months ago. It was fantastic! During the months between October-April the Palm Beach Green Market is a great place to go, and this market always has one of the best stands there. And I certainly was not disappointed when I stepped into their shop yesterday afternoon. When I glimpsed the sign that said Limes 15 for $1 and big watermelons for $2, I knew I had come to the right place. I got so excited that I stocked up on enough fruits and vegetables for a fortnight. ok where can you get 2 tomatoes, 3 plums, 4 peaches, 6 apples, 15 limes, a grapefruit, cucumber, pineapple, watermelon, bag of spinach, green onions, ginger root and a cilantro plant for only $17.87? It was incredible! And they sell coffee and pastries and sandwiches as well. They have a wide spread of good things to eat (some of them I had never even seen before) and everything seems to be very fresh. I don't know about you, but from now on I'm going to Don Victorio's!
Don Victorio’s Market, located at 7504 South Dixie Highway, just south of Forest Hill
you can read another person's opinion at:
http://devonshireofpalmbeach.com/blog/?p=752
Don Victorio’s Market, located at 7504 South Dixie Highway, just south of Forest Hill
you can read another person's opinion at:
http://devonshireofpalmbeach.com/blog/?p=752
Wednesday, July 13, 2011
How to eat good food when you're broke-Part 2
A few weeks ago Annetta, a great friend, came over to cook chili with me. It turned out so delicious that we wrote down the recipe. And today, I'm going to share it with you. Chili is such a comfort food, and is great especially when it's getting cooler outside. Of course, cornbread goes hand in hand with chili like peanut butter goes with jelly. Below you will find one of my favorite cornbread recipes.
Chili- by Stephanie and Annetta
You will need (for 8-10 servings):
2 cans spicy chili beans (in bean section of grocery store)
1 can kidney beans
1 can tomato sauce
1 can fire roasted garlic diced tomatoes
1 1/2 lbs ground beef
1 large vidalia onion (it's a sweet yellow onion)
1 package Lawry's chili seasoning (look near spices or soups)
1 tsp chili powder
1/4 tsp cayenne pepper
Dice the onions. Fry up beef in a frying pan and add in the onions before the meat is done so the onions get soft and the beef is brown. Put all of this stuff in a crock pot or a large pot with a lid on the stove on medium-low and stir well. After it is bubbly turn it down to low for at least 2-4 hours if you can. Something that makes chili so tasty is that it sits for several hours and all of the flavors mix together better and the beans get softer.
Serve with grated cheddar cheese or colby jack, sour cream and tortilla chips or fritos crushed on top and cornbread. It is so delicious and all of this chili stuff only costs about $10-$12! Chili freezes very well, so you can either fix it if you are having people over and are on a low budget, or you can split it up into Tupperware containers and freeze it for up to a month (maybe 2).
**Cornbread- one of the problems you sometimes come across with cornbread is that it is too dry (especially a day after you make it). With this recipe you don't have that problem! And may I suggest eating it with honey and applesauce- it's delicious
Chili- by Stephanie and Annetta
You will need (for 8-10 servings):
2 cans spicy chili beans (in bean section of grocery store)
1 can kidney beans
1 can tomato sauce
1 can fire roasted garlic diced tomatoes
1 1/2 lbs ground beef
1 large vidalia onion (it's a sweet yellow onion)
1 package Lawry's chili seasoning (look near spices or soups)
1 tsp chili powder
1/4 tsp cayenne pepper
Dice the onions. Fry up beef in a frying pan and add in the onions before the meat is done so the onions get soft and the beef is brown. Put all of this stuff in a crock pot or a large pot with a lid on the stove on medium-low and stir well. After it is bubbly turn it down to low for at least 2-4 hours if you can. Something that makes chili so tasty is that it sits for several hours and all of the flavors mix together better and the beans get softer.
Serve with grated cheddar cheese or colby jack, sour cream and tortilla chips or fritos crushed on top and cornbread. It is so delicious and all of this chili stuff only costs about $10-$12! Chili freezes very well, so you can either fix it if you are having people over and are on a low budget, or you can split it up into Tupperware containers and freeze it for up to a month (maybe 2).
**Cornbread- one of the problems you sometimes come across with cornbread is that it is too dry (especially a day after you make it). With this recipe you don't have that problem! And may I suggest eating it with honey and applesauce- it's delicious
Subscribe to:
Posts (Atom)


